This no bake Funfetti Lush is light, festive and irresistibly creamy! Layers of crunchy graham cracker crust, decadent cheesecake and smooth pudding come together with pops of rainbow sprinkles in every bite. It’s an easy, make-ahead dessert that’s perfect for parties and celebrations of all kinds!
Love sprinkles as much as I do? Make sure to try my Sprinkle Sugar Cookies, Funfetti Sheet Cake and these Birthday Cupcakes!
Funfetti Lush No Bake Dessert
I’m a big fan of sprinkles in desserts…on desserts…with desserts – really, anyway I can get ’em! They add such a fun pop of color that instantly makes kids and adults alike gravitate to the recipe. Also? You can’t beat a recipe that has a the word “fun” right in the title, am I right?
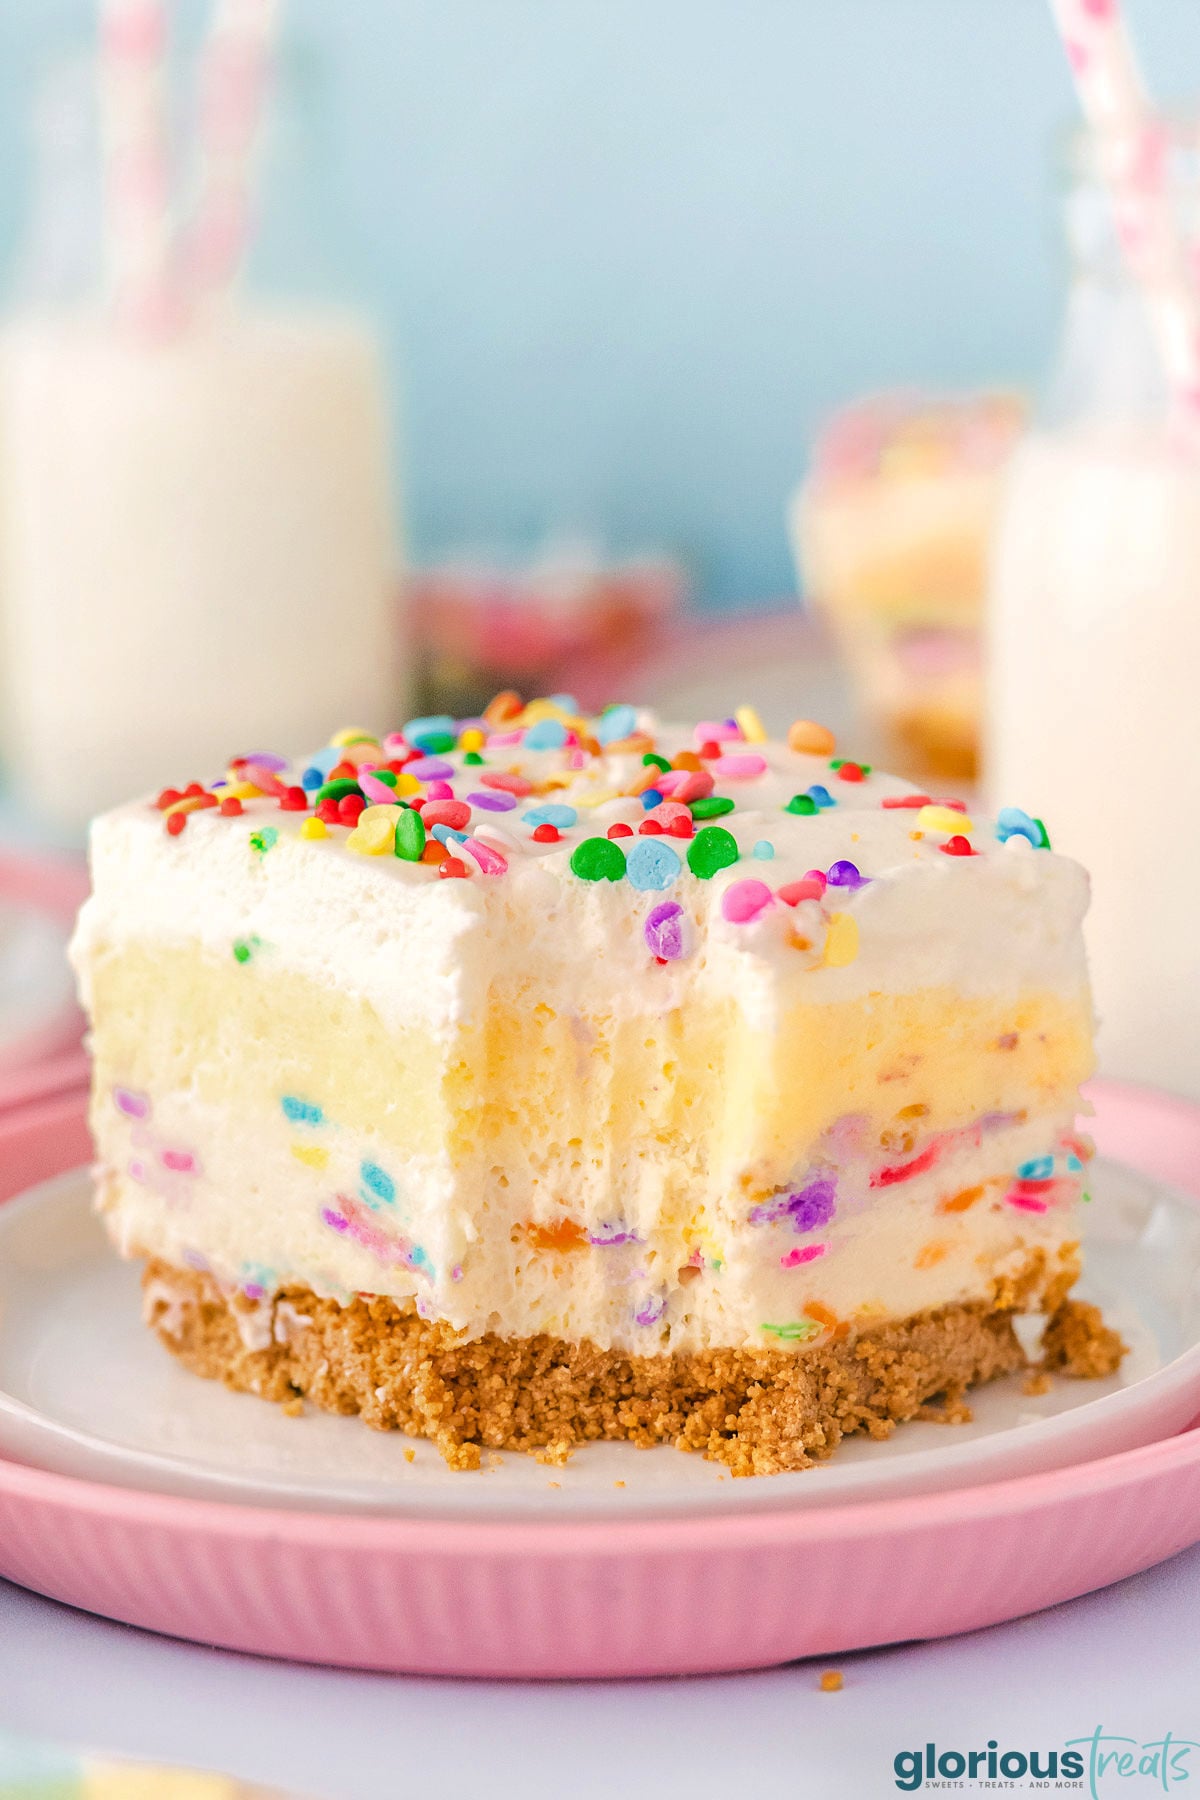
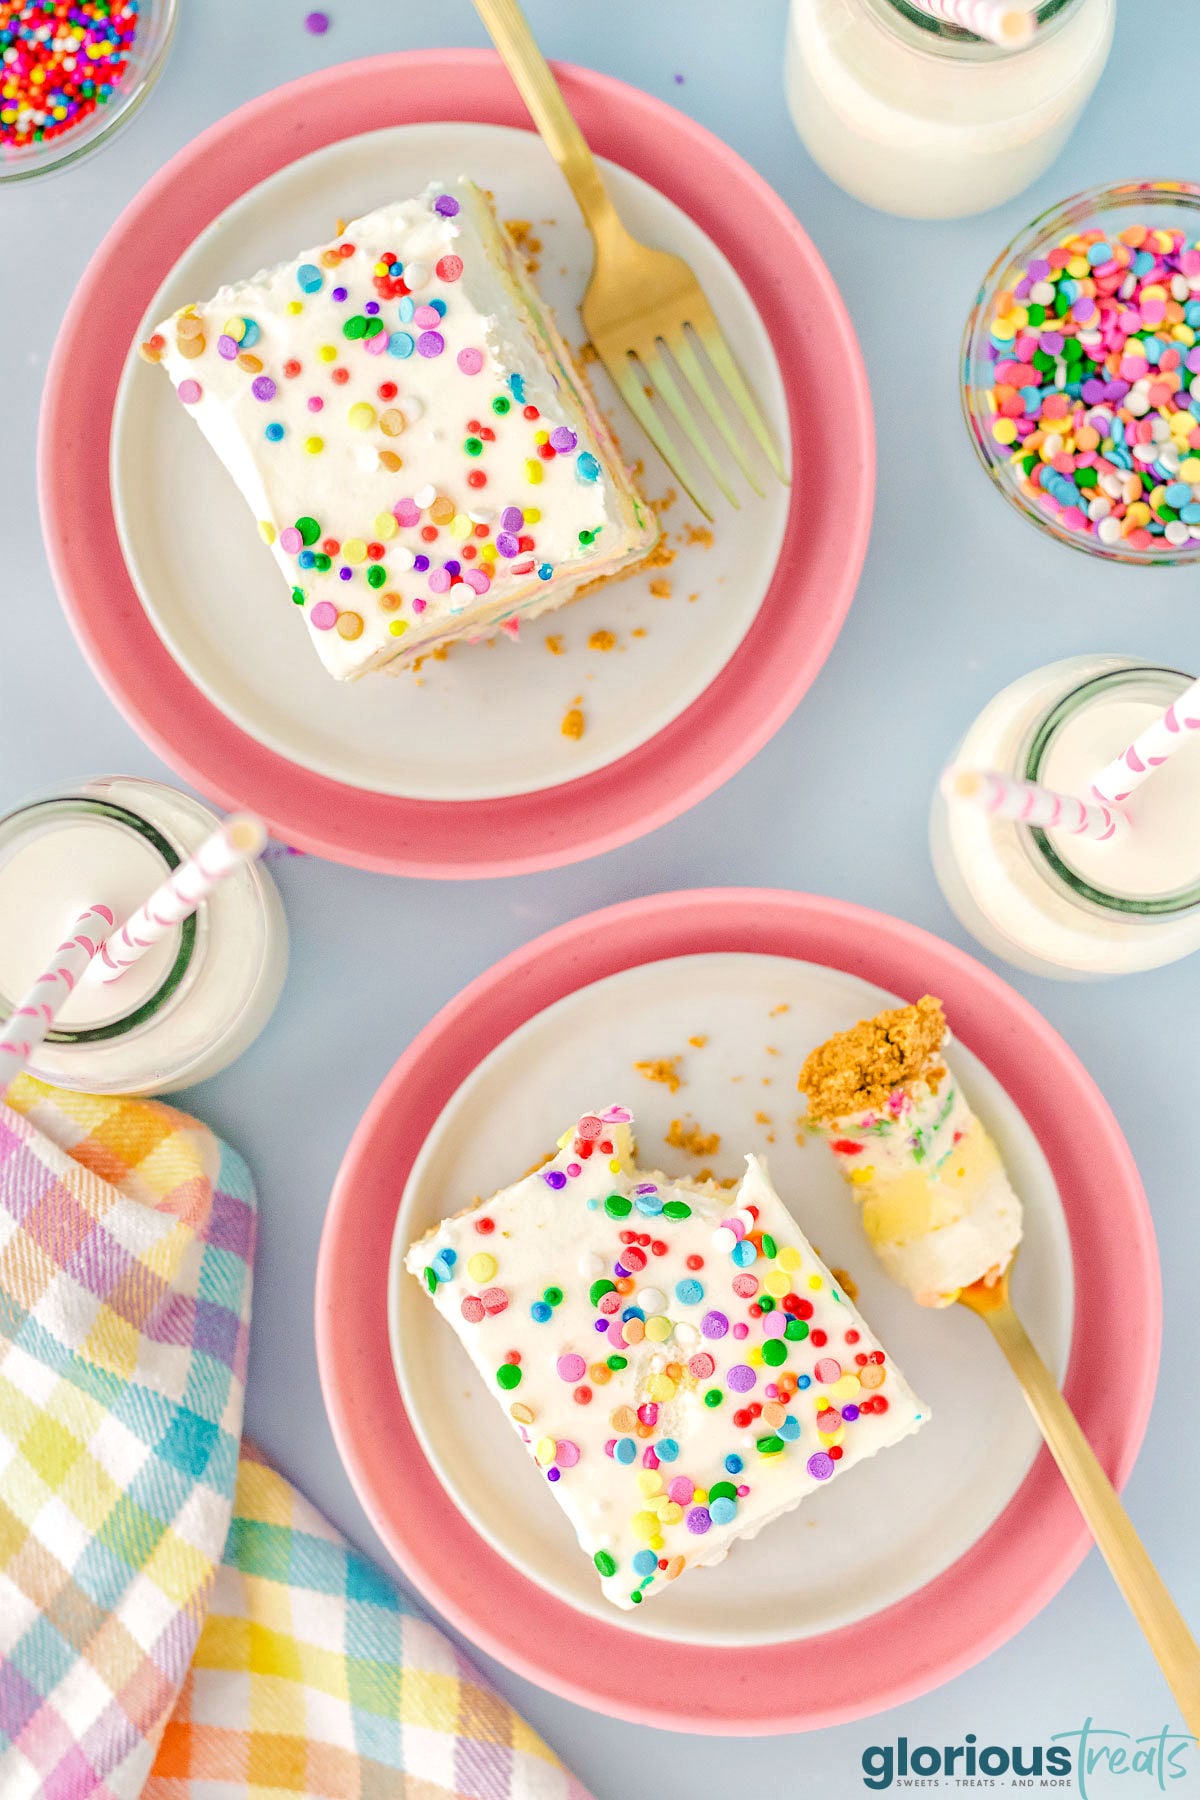
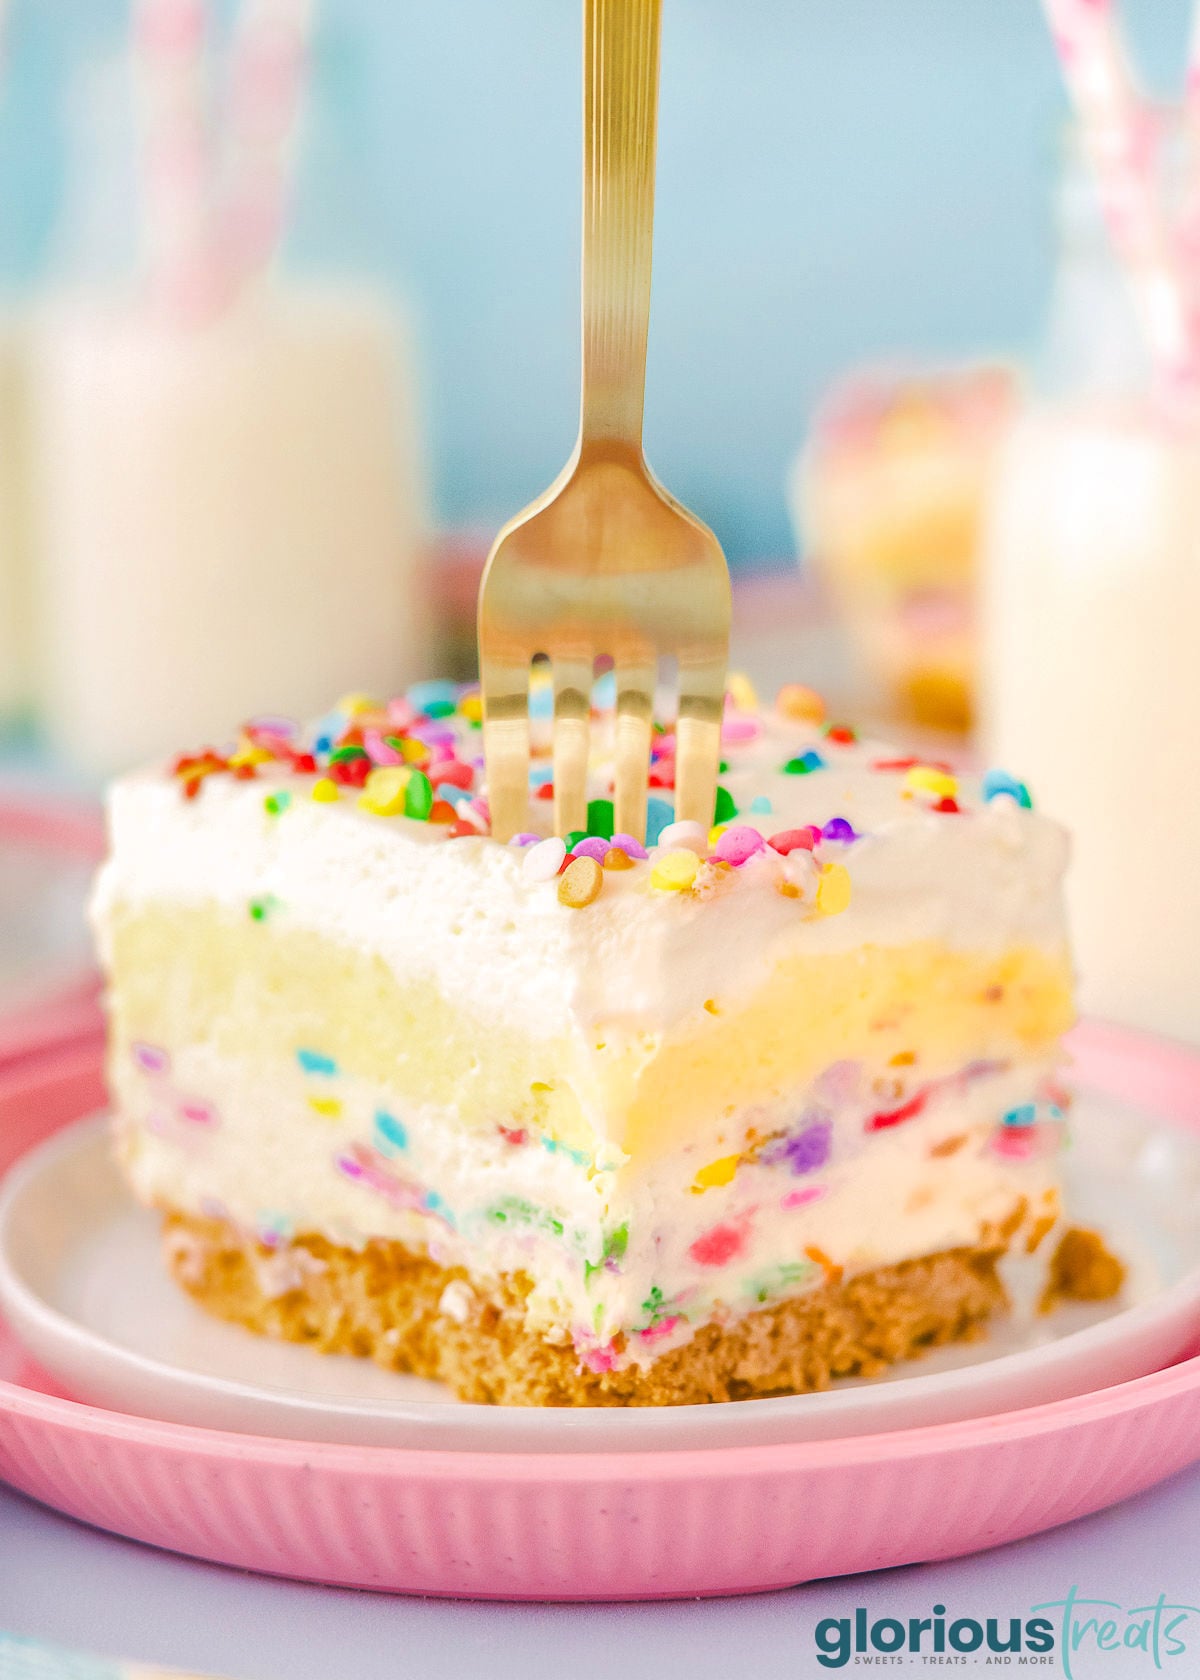
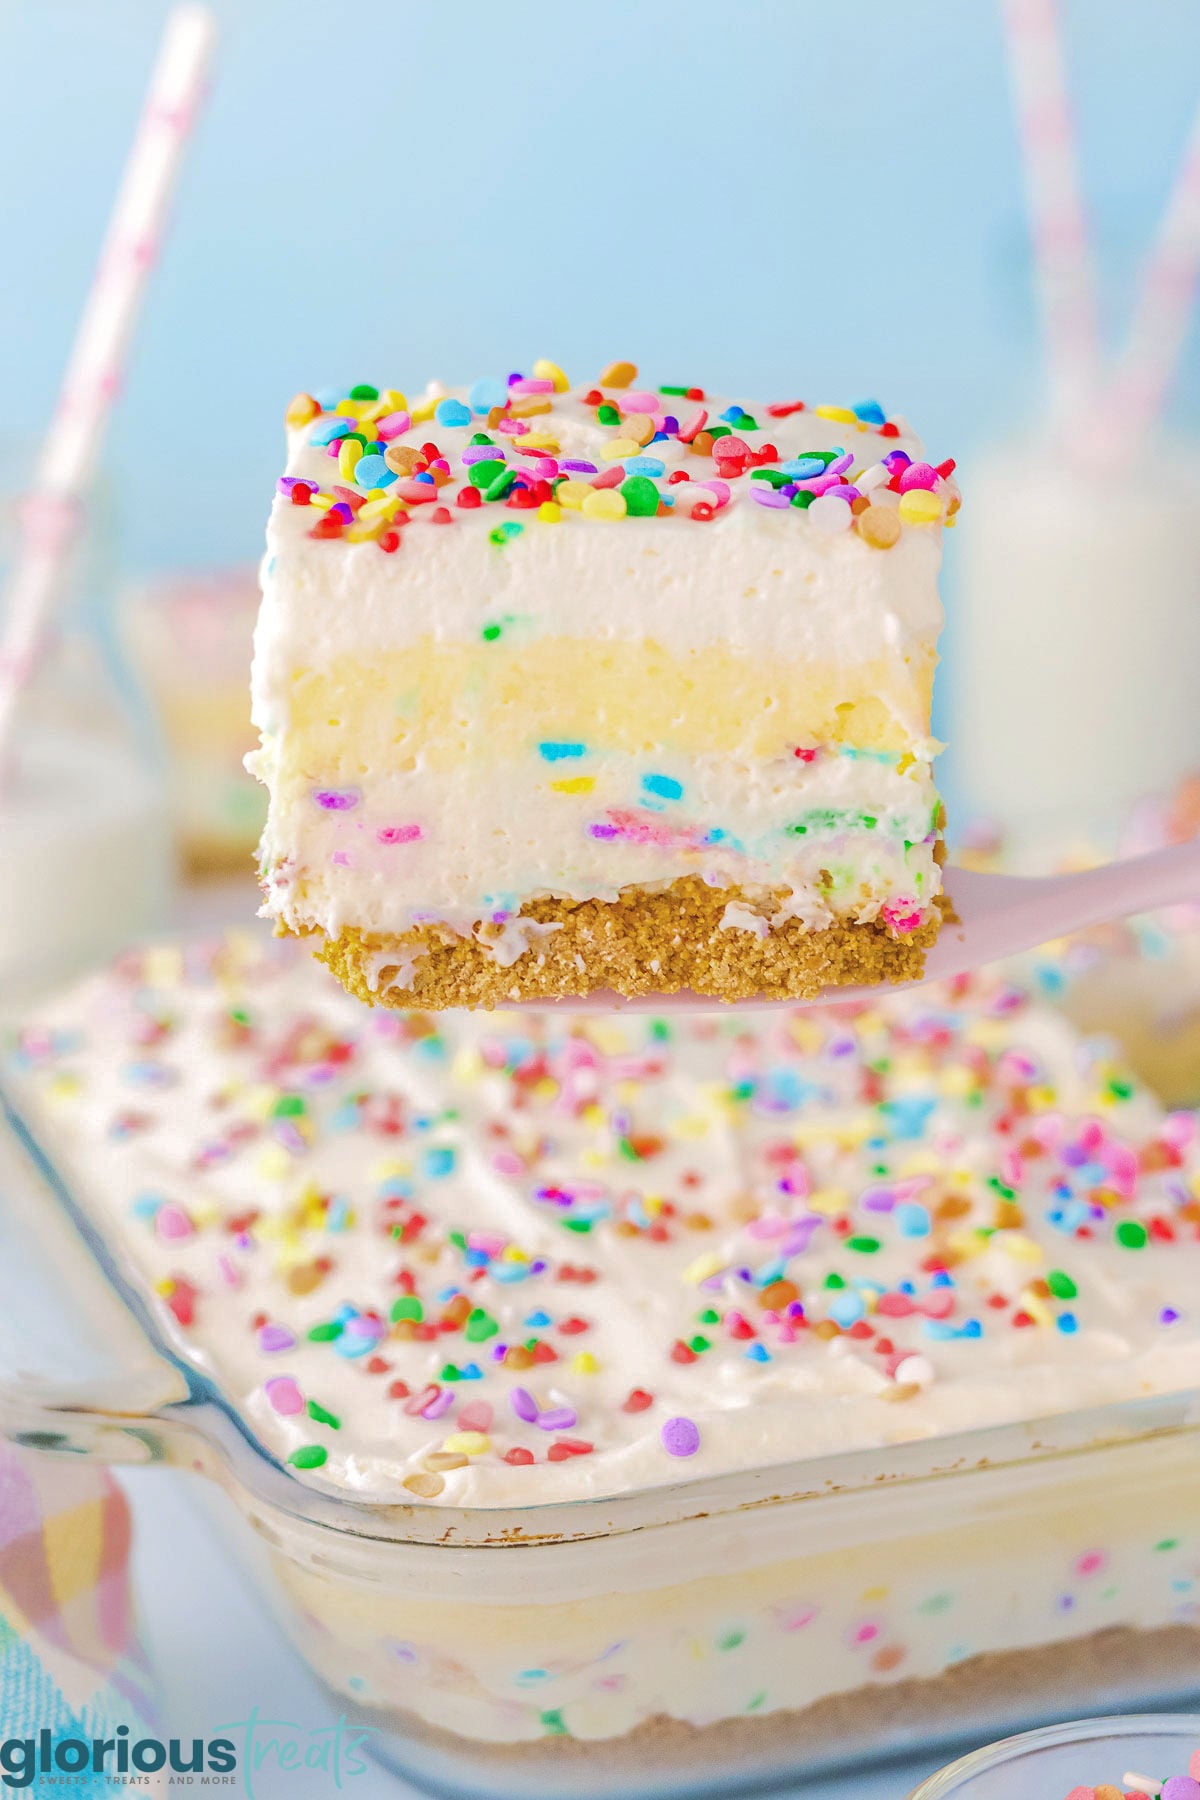
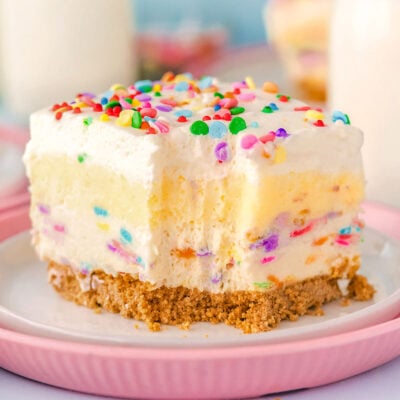
This easy.Funfetti Lush is a no-bake dessert that looks like a celebration! It is bright, creamy, irresistibly layered and so much fun! It starts with a classic graham cracker crust that’s buttery and slightly sweet. On top sits a thick, velvety cream cheese layer that’s sweet, smooth, and light, all speckled with rainbow sprinkles that give it a fun, confetti‑cake vibe.
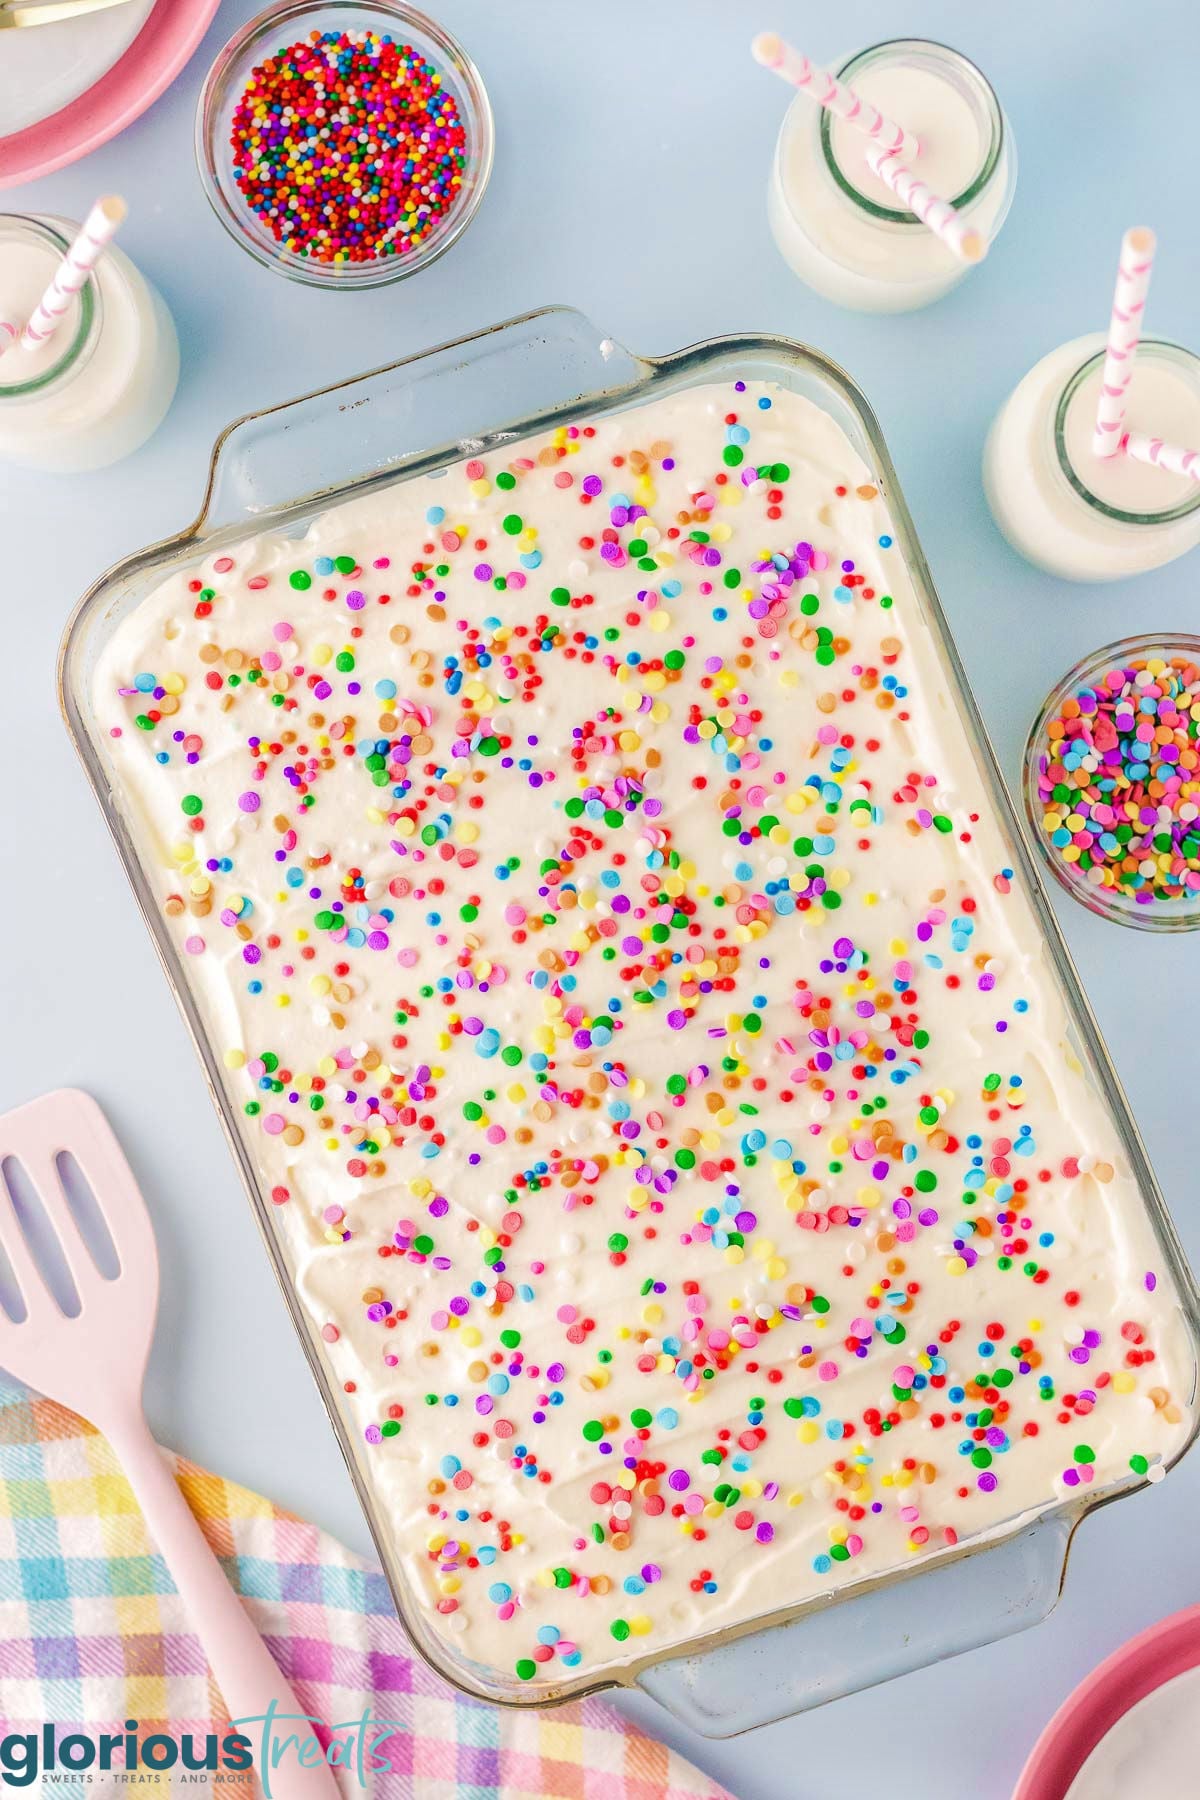
The next layer adds a rich, silky vanilla pudding cream that settles into a perfectly smooth blanket over the cheesecake filling, making each bite extra luscious. A final layer of whipped topping finishes the whole dessert and decorated with more sprinkles for a cheerful, party‑ready look.
Once chilled, the layers slice beautifully, creamy, colorful, and indulgent without feeling heavy. It’s the kind of dessert that makes people smile before they even take a bite. It’s a favorite for spring and summer!
Why You’ll Love This Recipe
This Funfetti Lush checks all the boxes for a crowd-pleasing dessert. It’s easy, festive, and full of flavor and texture in every bite.
- No-Bake: Simple mixing and layering means no complicated steps or oven time which is a requirement for hot summer days!
- Perfect for Celebrations: Bright sprinkles and creamy layers make it ideal for birthdays and special occasions.
- Make-Ahead Friendly: Prep it in advance and let the fridge do the work.
- Light Yet Indulgent: Rich flavors with a soft, airy texture that isn’t too heavy.
- Crowd-Pleasing Flavor: Classic vanilla and cheesecake flavors that everyone loves.
One of the best parts about this recipe is how easy it is to prepare. This recipe is no bake and most of the work is simple mixing and layering. It’s also a wonderful make-ahead option, which makes it ideal for entertaining. Just chill, slice, and serve a dessert that looks impressive and tastes even better. Perfect for any occasion!
What You’ll Need
This quick and easy no bake recipe comes together so quickly with easy-to-find ingredients and many that you likely already have on hand.
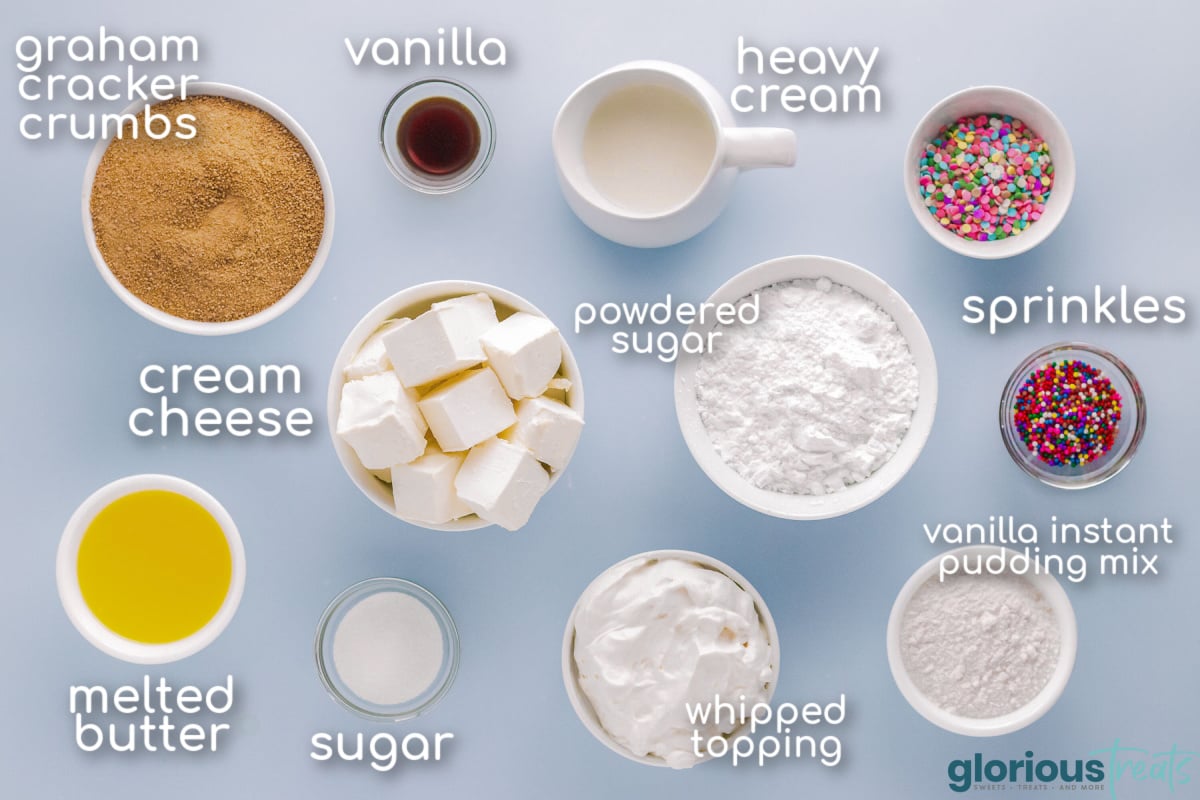
- Cream Cheese: I used Philadelphia full fat cream cheese. You can use a light or low-fat version but it doesn’t taste as creamy.
- Pudding: I used Jello brand instant vanilla pudding. Cheesecake, French Vanilla and even banana are all delicious options.
- Whipped Topping: I used Cool Whip. One regular sized tub is all you need for this recipe. Feel free to swap in homemade whipped cream instead but keep in mind that the lush won’t keep as long.
How To Make Funfetti Lush
If you love funfetti desserts, this Funfetti Lush is going to be a new favorite. With its buttery crust, velvety cheesecake layer, and soft pudding topping, it’s perfectly balanced and wonderfully indulgent without being heavy. Make it ahead, chill, and enjoy a colorful dessert that’s always a hit.
Here’s a quick look at how to make this lush dessert, and as always, you can find the full printable recipe card at the end of this post.
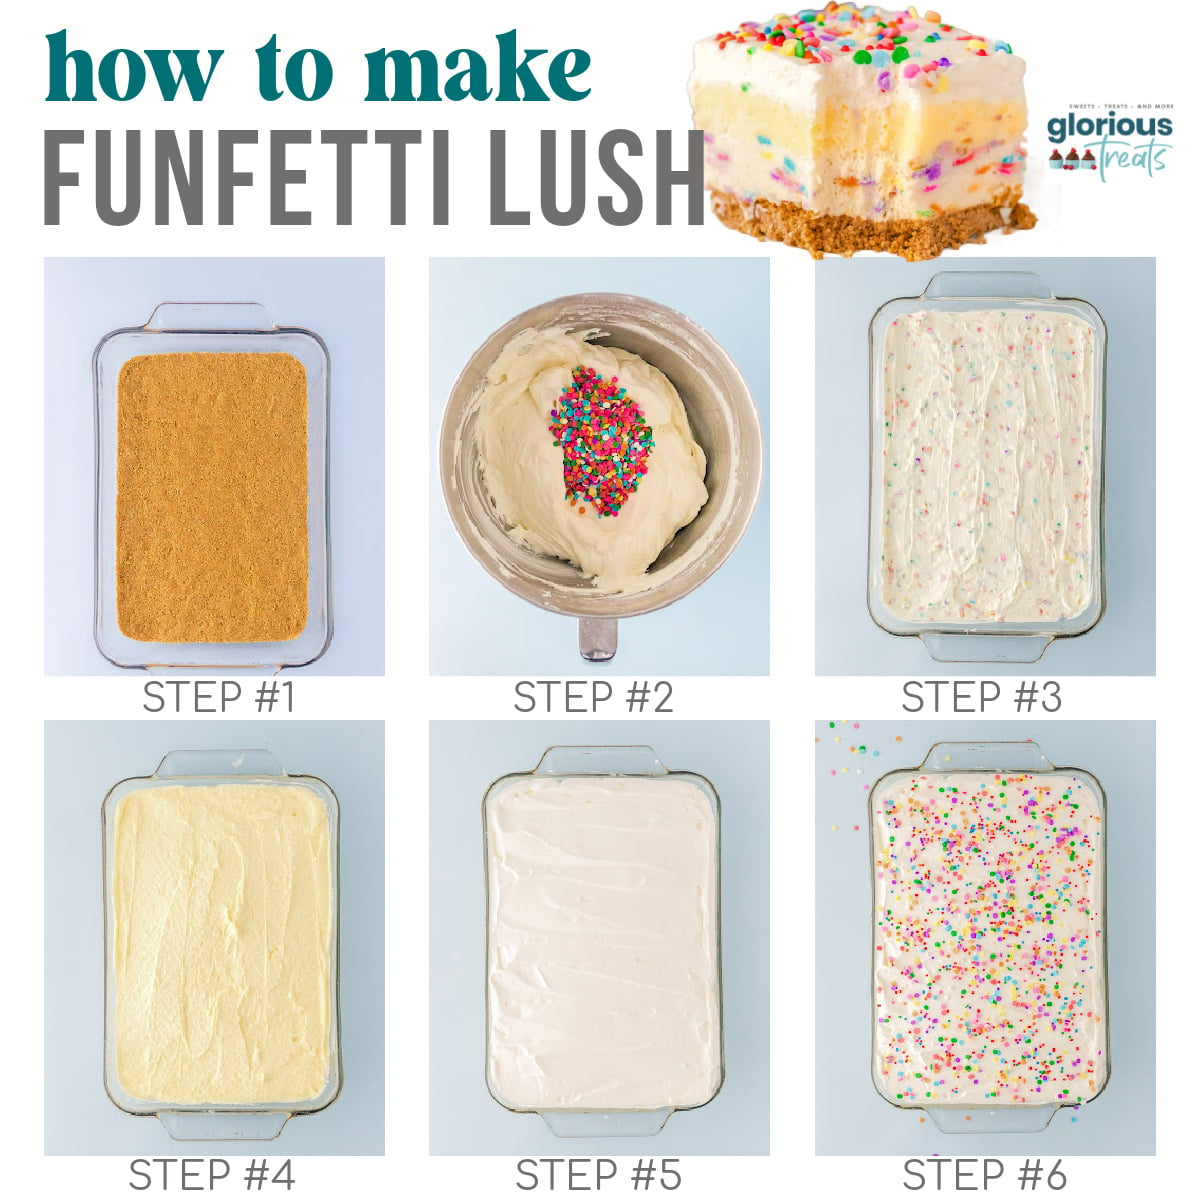
- Combine graham cracker crumbs, sugar and melted butter and press firmly into the bottom of a 9×9 (for thicker dessert) or 9×13 pan (for slightly thinner lush). Chill.
- Beat cream cheese, vanilla extract, powdered sugar and heavy cream until smooth and creamy. Fold the whipped topping and then add the sprinkles and fold into the batter.
- Evenly spread over the graham cracker crust and smooth it out so that it is even. Chill.
- Whisk the vanilla pudding mix with the heavy cream and spread evenly over the cheesecake layer.
- Spread whipped topping (or whipped cream if using) over the pudding layer.
- Top with rainbow sprinkles. Cover and refrigerate for 4 hours or up to overnight. Serve and enjoy!
Storage Information
- Refrigerator: Store leftovers, covered, in the fridge for up to 5 days.
- Freezer: Cover the pan completely with plastic wrap then wrap in tin foil. Freeze for up to 3 months. Thaw in the fridge when you are ready to serve or serve frozen for a cold treat.
- Notes: If you are making this with the plan of freezing it for later, I would suggest not topping it with the sprinkles until it has thawed. The color in the sprinkles can run into the whipped topping and won’t look as good. This only impacts the aesthetics, the flavor is fine if you do end up freezing the sprinkles.
Variations To Try
This recipe is easy to customize based on your preferences or occasion.
- Swap in different colored sprinkles for different holidays and occasions! It’s an easy, colorful dessert that’s perfect for customizing.
- Try a different flavored pudding. Banana cream, cheesecake and french vanilla are all delicious!
- The crust can be made with Oreos or Nilla Wafers if you prefer.
- Use whipped cream in place of the whipped topping if you prefer. Just keep in mind that you will want to enjoy within 24 hours.
- This dessert can be assembled in a variety of size dishes. Anything from an 8×8 to a 9×13 will work. Just depends on how thick you want the layers or how far you need to stretch the dessert. For reference, I used an8x10 baking dish.
- Make it mini! Assemble the lush in individual cups for easy serving at parties.
Can I use homemade whipped cream instead of whipped topping?
Yes! Freshly whipped cream works beautifully. Just make sure it’s whipped to stiff peaks for stability.
Do I have to use heavy cream for the pudding layer?
Heavy cream creates a thicker, richer texture, but you can substitute milk for a lighter version.
Can I make this dessert ahead of time?
Absolutely. It actually tastes better after chilling for several hours or overnight.
Will the sprinkles bleed into the layers?
Some light color transfer may occur, but using high-quality sprinkles helps minimize this.
Trish’s Tips
- Press the crust firmly in the pan. If you are having a hard time pressing firmly, use the bottom of a greased drinking glass or measuring cup to give you a bit more pressure. A well-packed crust helps keep the layers neat when slicing.
- Room temperature cream cheese whips up so much easier and better than chilled cream cheese. You’ll end up with lumps if it is too cold.
- I used Philadelphia full fat cream cheese. You can use a light or low-fat version but it doesn’t taste as creamy.
- I used Jello brand instant vanilla pudding. Banana cream, cheesecake and french vanilla are all delicious!
- I used Cool Whip whipped topping. One regular sized tub is all you need for this recipe.
- Keep the lush in the fridge while you are making the layers. Even a few minutes of chill time can help the next layer spread smoothly.
- This dessert needs time to set for the best texture and clean slices so don’t skip the chill time!
- Use quality sprinkles in this recipe. They hold their color the best and give the dessert a flawless finish.
More No Bake Desserts To Try
- No Bake Cherry Cheesecake
- No Bake Cookies
- Cannoli Dip
- Brownie Batter Dip
- Magnolia Bakery Banana Pudding
Funfetti Lush
Ingredients
Graham Cracker Crust
- 2 cups graham cracker crumbs (9oz, 250g)
- 2 tablespoons granulated sugar
- ½ cup unsalted butter melted (4oz, 115g)
Cheesecake Layer
- 16 ounces cream cheese room temperature (454g, 2 blocks)
- 2 teaspoon vanilla extract
- 1 ½ cups powdered sugar (7oz, 195g)
- 2 tablespoons heavy cream
- 4 ounces whipped topping (113g) – I used Cool Whip
- ⅓ cup rainbow sprinkles
Pudding Layer
- 6.8 ounces vanilla instant pudding mix 2 x 3.4 oz boxes
- 1 ½ cups heavy cream (12 fl oz, 375ml)
Topping and Garnish
- 4 oz whipped topping or freshly whipped cream (113g)
- 2-3 tablespoons rainbow sprinkles
Instructions
For The Graham Cracker Crust Layer
- Lightly spray a 9×9 (for thicker dessert) or 9×13 pan (for slightly thinner lush) with nonstick cooking spray. Set aside.
- In a medium mixing bowl, stir together the graham cracker crumbs, granulated sugar and melted butter. The mixture will be a little clumpy and look damp. If you press it between your fingertips, it should stick together.2 cups graham cracker crumbs, 2 tablespoons granulated sugar, ½ cup unsalted butter
- Press the crust firmly into the bottom of the pan. Place the pan in the fridge to chill while we start the cream cheese layer.
For the Cheesecake Layer
- In the bowl of your stand mixer or a large mixing bowl, use the whisk attachment to beat the cream cheese, vanilla extract, powdered sugar and heavy cream on high speed until smooth and creamy.16 ounces cream cheese, 2 teaspoon vanilla extract, 1 ½ cups powdered sugar, 2 tablespoons heavy cream
- Use a rubber spatula to fold the whipped topping through the cream cheese mixture.4 ounces whipped topping
- Add the sprinkles and fold into the batter.⅓ cup rainbow sprinkles
- Spoon the filling over the crust and smooth it out so that it is even. Pop the pan back in the fridge to chill while we start on the pudding layer.
For the Pudding Layer
- In a large mixing bowl, whisk the vanilla pudding mix with the heavy cream (you can do this by hand, with a hand mixer or use a stand mixer.)6.8 ounces vanilla instant pudding mix, 1 ½ cups heavy cream
- Spread the pudding layer, evenly, over the cheesecake layer.
Topping and Garnish Layer
- Finally, spoon the whipped topping (or whipped cream if using) over the pudding layer. Top with rainbow sprinkles.4 oz whipped topping, 2-3 tablespoons rainbow sprinkles
- Cover with plastic wrap and transfer to the fridge to set for 4 hours or up to overnight. Once chilled, serve and enjoy!
Notes
- Refrigerator: Store leftovers, covered, in the fridge for up to 5 days.
- Freezer: Cover the pan completely with plastic wrap then wrap in tin foil. Freeze for up to 3 months. Thaw in the fridge when you are ready to serve or serve frozen for a cold treat.
- Notes: If you are making this with the plan of freezing it for later, I would suggest not topping it with the sprinkles until it has thawed. The color in the sprinkles can run into the whipped topping and won’t look as good. This only impacts the aesthetics, the flavor is fine if you do end up freezing the sprinkles.
Equipment Needed (affiliate links): Glass Mixing Bowls |Electric Mixer (Hand Mixer or Stand Mixer)| Whisk
Please see post above for more information, step-by-step photos, recipe tips and frequently asked questions.
Leave a Reply