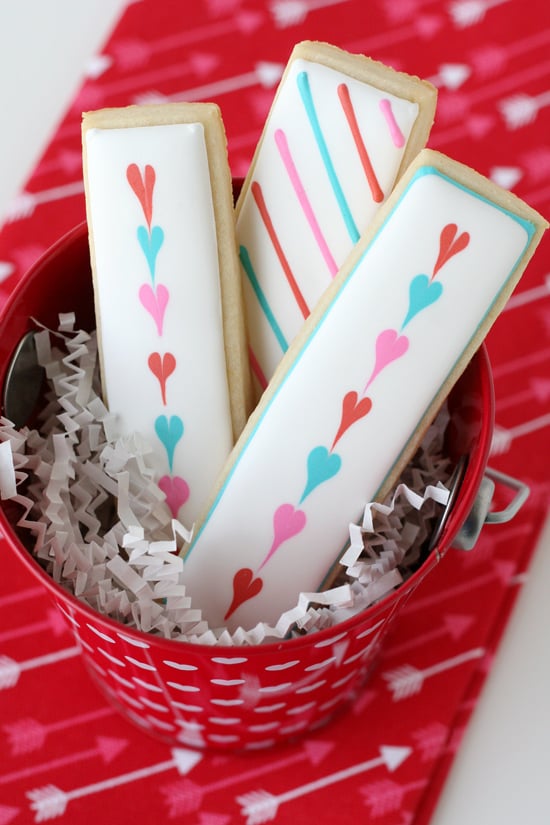
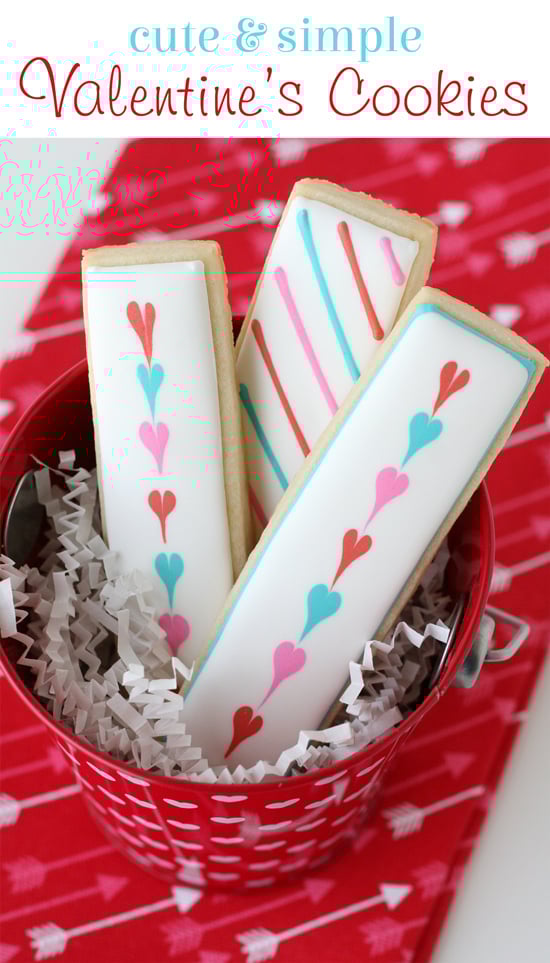
I love cute cookies…. I also love cookies that don’t take 10 hours to decorate! These Cute & Simple Valentine’s Cookie Sticks are a perfect little treat to share with the people you love!
I love decorating cookies, but don’t always have the time for complex designs. For most of my cookies, I love using fun colors and simple designs to create something that is cute, delicious and simply makes a “sweet” little gift for family and friends.
I’ve seen a few cookie friends making fun things with simple, thin rectangle shapes and wanted to play along. My sweet friend Meaghan of The Decorated Cookie has made several fun ones, and the talented artists behind Melissa Joy Cookies, The Cookie Corner, and Munchkin Munchies have each done some beautiful designs on skinny rectangles.
I have a large rectangle cookie cutter that I’ve used in the past to cut smaller shapes from, but I realized it would be so nice to be able to cut several long rectangles at once. I contacted my friends over at Truly Mad Plastics and told them what I had in mind… a few days later I had these awesome cutters delivered!
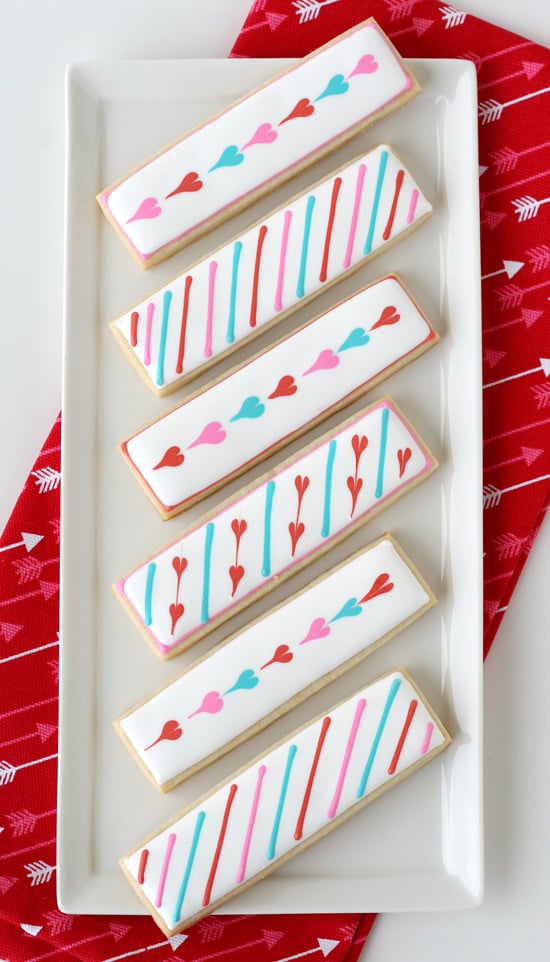
For these Simple Valentine’s Cookie Sticks I used the cutter that makes 1″x4″ cookies. Feel free to adjust the dimensions to your liking, and you can certainly cut them out individually using a knife (and ruler) on well chilled dough.
Let’s get started!
For these cookies you’ll need…
A batch of cookie dough using my Rolled Sugar Cookie Recipe.
A batch of Royal Icing.
I prepared thick/outline consistency icing in white, red, pink and blue, and fitted them with 1.5PME tips. I also prepared a medium/flood consistency icing in the same colors, and fitted those bags with a #2 tip.
Note- The thick/outline icing should be about the thickness of toothpaste. Thick enough that it stays in place when piped onto a cookie, but not so thick that it hurts your hand to squeeze out the bag.
Medium/flood consistency icing should be about the thickness of shampoo, or corn syrup. Just thin enough that when you are stirring the icing in a bowl and you pick up the spoon and allow icing from the spoon to fall into the bowl, the line of icing should disappear into the rest of the icing in about 12-15 seconds.

Step 1- Outline one or two cookies at a time, using thick/outline icing and a #1.5 or #2 tip.
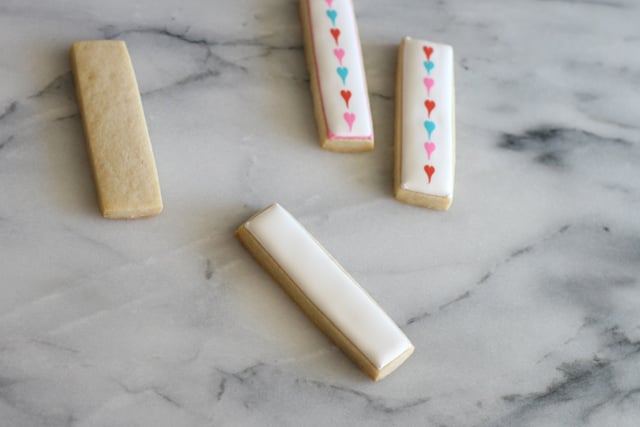
Step 2- Immediately fill in the cookie using medium/flood consistency icing and a #2 tip.
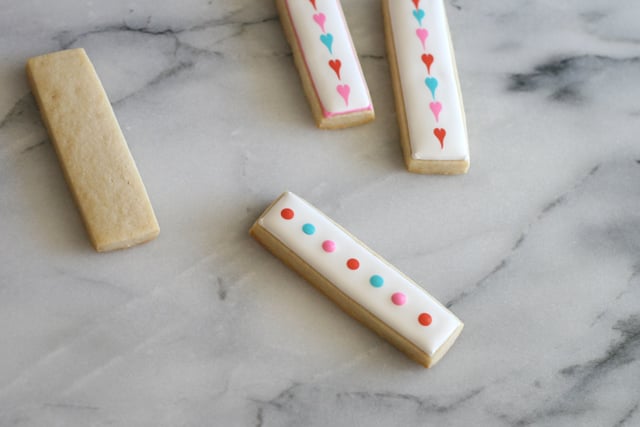
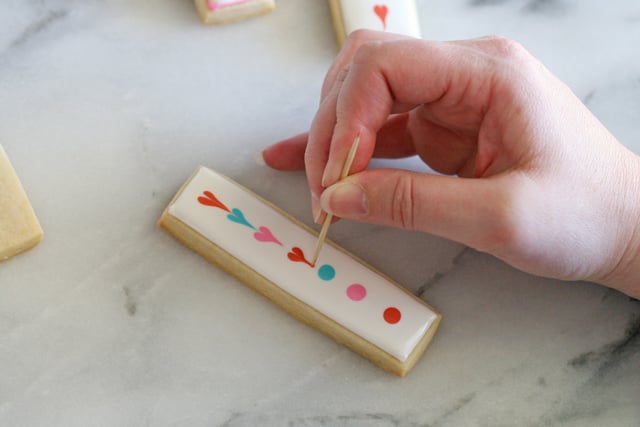
Step 3- As soon as you’ve flooded the cookie, and the icing (on the cookie) has leveled out, drop dots of medium/flood consistency icing in your choice of colors.
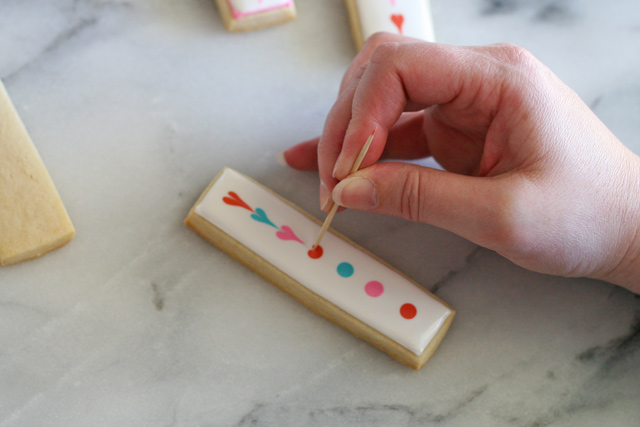
Step 4- (see photo above and below) Use a toothpick to drag a line from the top of each dot, down through the dot. After running through one dot (and just before you touch the next dot), pick up the toothpick and wipe the end onto a paper towel or cloth. Immediately continue with each additional dot. If you run a toothpick down through all of the dots at once, the colors will run from one dot to the next. This works fine if all of your dots are the same color, as I did with these Simple Heart Cookies, but I would not recommend it for multi color dots.

Step 5 – You’re done! Set aside and move to the next cookie. Allow icing to dry 8 hours before packaging cookies.
For the other designs pictured above, I just played around with a combination of hearts and lines. For the striped cookies, I outlined and flooded the cookies, then used the thicker/outline consistency icing for the stripes.
Play around with any combination of dots, hearts and stripes. If you want to outline the cookie in one color (such as blue, pink or red) and then flood in another color (such as white), allow the outline to dry just a bit (15 minutes or more) before filling in with white.
Looking for more sweet Valentine’s Day ideas? Find more cute cookies, delicious cupcakes, and pretty cakes by browsing my past Valentine’s Day posts.
Happy decorating!
Valentine’s Day Cookie Sticks
Ingredients
Sugar Cookies
- 3 cups all-purpose flour
- 1 teaspoon baking powder
- ¼ teaspoon fine sea salt or kosher salt
- 1 cup unsalted butter 2 sticks, room temperature
- 1 cup granulated sugar
- 1 large egg room temperature
- 1 teaspoon vanilla extract see flavor options in notes
Royal Icing
- 4 tablespoons meringue powder I use Wilton Brand
- 4 cups powdered sugar about 1 pound
- 6 tablespoons warm water to start, see additional notes below
- gel food coloring
Instructions
Cookies
- In a medium bowl, stir together the flour, baking powder and salt, and set aside.
- In the bowl of an electric mixer, using the paddle attachment, cream together the butter and sugar until light and fluffy. This should take 2-3 minutes.
- Add the egg and vanilla and beat another minute or so.
- Add the flour mixture slowly. (Be careful not to add too much at a time or you will have a snowstorm of flour.)
- Blend until all of the flour is incorporated. The mixture will look crumbly at first but just keep blending until the dough begins to pull away from the sides of the bowl.
- Remove about half of the dough from the bowl and knead by hand just a bit to form a smooth ball. Roll out dough onto a lightly floured work surface, or onto a piece of plastic wrap (as described in detail in the blog post above).
- Cut out cookies into desired shapes and place entire baking sheet of unbaked cookies into the freezer for 5 minutes.
- Preheat oven to 350°F and bake cookies in preheated oven for 9-11 minutes, depending on the size and thickness of your cookies.
- The cookies are baked when then are no longer shinny on top, but they will not show much of any change in color.
- Cool on baking sheet just a minute or so, then carefully move to a wire cooling rack and allow to cool fully before decorating.
Icing
- Beat all ingredients until stiff peaks form. *Make sure all bowls and utensils are totally grease-free or your icing will never reach proper consistency.
- Spoon some of the thick white icing into individual bowls and add coloring as desired.Add additional water, about 1 teaspoon at a time until you’ve reached the consistency you need.
- I prepared thick/outline consistency icing in white, red, pink and blue, and fitted them with 1.5PME tips. I also prepared a medium/flood consistency icing in the same colors, and fitted those bags with a #2 tip.Note- The thick/outline icing should be about the thickness of toothpaste. Thick enough that it stays in place when piped onto a cookie, but not so thick that it hurts your hand to squeeze out the bag.Medium/flood consistency icing should be about the thickness of shampoo, or corn syrup. Just thin enough that when you are stirring the icing in a bowl and you pick up the spoon and allow icing from the spoon to fall into the bowl, the line of icing should disappear into the rest of the icing in about 12-15 seconds.


How have I just now found you?! I have been using your cream cheese icing recipes for at least a year, but just looked around to the rest of your amazing stuff. Thank you for such great recipes and easy to follow directions. My kids’ birthdays with never be the same.
You’re so sweet! Thanks so much for your lovely comment! So glad to hear you found some inspiration here! Happy baking!
I just made the egg shaped cookie boxes and it was so much fun. I made a smaller size than the picture looks like. The dough rolls out beautifully. After experimenting I found that it worked best if I cut out the centers before baking-they tended to crack if I cut them afterwards. Also, since I was already making Easter candy I put them together with melted chocolate. I’m going to try decorating the tops with white chocolate. Thanks.
Super cute cookies and beautiful photos!! I love the rectangular shape and the simple way you made the hearts 🙂
As simple as it should be. I LOVE IT!!!
Your cookies are so pretty, Glory! I am terrible at decorating but you always inspire me 🙂 They look perfect!
just darling…my husband always asks me to make those little hearts, he thinks it is the coolest design ever. I guess this holiday is made for that technique!
These look amazing! Almost to cute to eat.
Love Love Love!! Have to start saving up for some new cookie cutters 😀