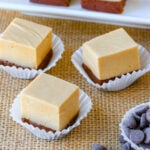
Chocolate Peanut Butter Fudge
Servings: 36
Calories: 180kcal
This decadent Chocolate Peanut Butter Fudge is wonderfully creamy and rich - perfect for sharing with family and friends! With two distinct layers of rich chocolate fudge and nutty peanut butter fudge, this stunning fudge promises to be a glorious addition to your collection of cherished recipes!
Print Recipe
Ingredients
Chocolate layer
- 1 ½ cups sugar
- 6 tablespoons butter
- ½ cup heavy cream or (canned) evaporated milk
- 8 ounces semi sweet chocolate
- 3.5 ounces marshmallow cream 1/2 of a 7 oz jar, eye ball it the best you can
- ½ teaspoon vanilla extract
Peanut Butter layer
- 1 ½ cups sugar
- 6 tablespoons butter
- ½ cup heavy cream or canned evaporated milk
- 1 cup white chocolate morsels, or 8 oz from a bar
- 6 tablespoons creamy natural peanut butter 1/4 cup plus 2 tablespoons
- 3.5 ounces marshmallow cream 1/2 of a 7 oz. jar
- ½ teaspoon vanilla extract
Instructions
Prepare the pan
- Line an 8" square pan with parchment paper or foil, leaving extra hanging over the sides, so the fudge can be easily removed once set.
Make the chocolate layer
- In a large saucepan, heat sugar, butter and cream over medium-high heat. Bring ingredients to a boil, gently stiring constantly. Allow mixture to boil 4 minutes (set a timer), or until the mixture reaches 234*F (gently stiring constantly).
- Remove pan from heat and add chocolate and marshmallow cream. Stir until melted and fully combined, 1-2 minutes.
- Add vanilla. Stir well to fully incorporate.
- Pour fudge into prepared pan. Smooth as needed. Set pan in the fridge while preparing the next layer.
Peanut Butter layer
- In a large saucepan, heat sugar, butter and cream over medium-high heat. Bring ingredients to a boil, gently stiring constantly. Allow mixture to boil 4 minutes (set a timer), or until the mixture reaches 234*F (gently stiring constantly).
- Remove pan from heat and add white chocolate, peanut butter and marshmallow cream. Stir until melted and fully combined, 1-2 minutes.
- Add vanilla. Stir well to fully incorporate.
- Pour peanut butter fudge on top of (slighly chilled) chocolate fudge. Return pan to fridge and refrigerate about 3 hours, until firm.
- To cut, lift entire block of fudge from the pan, by pulling up on the parchment (or foil) liner. Use a sharp, straight edge knife, rinsing off the knife in warm water (then wiping dry) as needed between cuts. Store fudge in fridge until ready to serve.
Notes
Use unsalted butter plus a pinch of salt, or salted butter.
Use natural peanut butter, the only ingredients should be peanuts and salt (or just peanuts).
I added the desired temperature (234°F.) for those who like exacting recipes. I have been able to successfully make this recipe without the use of a thermometer, by following the directions listed.
Nutrition
Calories: 180kcal | Carbohydrates: 28g | Protein: 2g | Fat: 8g | Saturated Fat: 4g | Cholesterol: 11mg | Sodium: 24mg | Potassium: 75mg | Fiber: 1g | Sugar: 25g | Vitamin A: 109IU | Calcium: 22mg | Iron: 1mg